


Working in the Word Mines – Novel Planning Worksheet
This is the worksheet that I use for planning out my novels. One quick note: the first tab is based on the story structure that Dan Wells advocates, although I tend to play pretty fast and loose with his good advice. If you aren’t familiar with this structure, I highly recommend following the link and checking it out.
As I’ve mentioned before, I use several different pieces of software during the creation of a novel, but this worksheet is in plain old Excel. You can get a copy here. If you don’t have a copy of Excel (or equivalent), you can upload this to Google Docs for free and use it that way.
I’m in this worksheet daily, far more than any of my other tools. It helps me with four basic functions:
Overall Plot Structure

Tab one is where the big plot goes.
Column A, the blue one on the left, matches the story structure I’m using and lists the seven major steps that I want to keep track of for each story and character arc. Column B is for the main plot. This is where I’ll jot down a quick note for each step of the primary story. You don’t need much detail here. The other columns are for any character or sub-plot arcs that you have. This will be much more sparse, and you’ll want to put them near the row that matches the main story arc where they happen. Take a look at the Dan Wells videos for more details on this. Also, this isn’t carved in stone, feel free to put whatever plot markers you like in column A. The goal is just to have all your plot threads on one page.
Scenes

This is where I list out all of the scenes that I want to put in the book, in order. In the example workbook, you’ll notice that there is a column for each day where those scenes would take place. There’s no need to use a day structure, of course. You can use a single column with a long scene list, or break it up by parts of the book or plot. The goal is to lay them out in a way that’s easy to look at so you can get a feel for the passage of events. Again, not much detail needs to go here. Think index cards. As you write, you’ll be inserting or deleting scenes, which is why I like a spreadsheet for this. Also, notice that there is a small column called “Ch”, where you can list the chapters that the scenes are actually in. Fill this out after you write the scene, so that you can quickly find it during later drafts. In many cases, I’ll have an idea for a particular scene long after I write it, and this helps me not only find it, but also to remind me of the events surrounding it, just in case I’m about to screw up my plot.
Adds

These are revision notes. The first column is whether or not you’ve made the revision, the second is what chapter the revision is for, and the last column is for the actual note. I use this tab whenever I have an idea to implement later, to keep me from being sidetracked from the task at hand. I frequently think of something cool while writing chapter 20 which requires me to go back and put a gun/spaceship/baby doll in chapter 3. Instead of losing my train of thought, I just jot down a reminder here and then keep going. When it’s time to revise, this is the first place I go. Note that after these changes are in, the resulting manuscript should still be considered first draft. Once that’s done, then I start the second draft and use this tab again to note things that I see as I revise. Rinse, repeat.
Quota Tracking
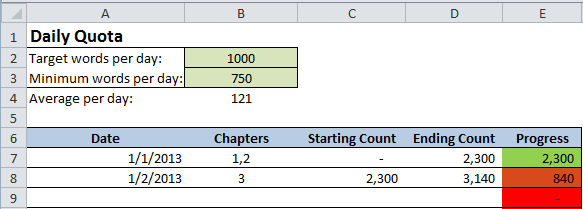
Love, meet hate. Don’t skip this tab. Use it, especially if you have a deadline. If you don’t have a deadline, give yourself one, then use this tab. The first column is for the date. Never skip a date here. Ever. If you can’t write that day, then your progress is zero, but it still needs to be noted. This serves two purposes. The first is that your average words per day are calculated correctly, and the second is that it provides motivation to get some words down in order to keep a writing streak alive. If you’ve made progress for a solid week or month, the last thing you want to do is drop in a big ol’ zero. You can use whatever quota you like, but this tab is currently set for 1000 words a day. If you change the cells for target and minimum words per day, the colors will follow. Enter in your starting count and ending count each day, and the progress column will automatically calculate your progress.
The goal with this workbook is to have a quick and easy map of your book to work from. The plot tab is basically a big overview, the scene tab is a more detailed roadmap, and the last two tabs are to provide course corrections and to keep you moving. When you finish a scene, check to see what the next scene needs to be. If you get a great idea, take a quick look at where it fits in the existing structure. Need to chop something for length? Scan the scene list for organ donors. You’ll be surprised how often you come back and check this road map during all stages of completion.
I use the hell out of this thing. It’s made a big difference to me in terms of being on time and producing coherent plots, and I hope it does the same for you.


Appreciate it for this marvellous post, I am glad I detected this site on yahoo.
The story structure suggested at http://www.clickok.co.uk/index4.html is the one to use.
Thanks for one’s marvelous posting! I certainly enjoyed reading it,
you may be a great author.I will always bookmark your blog andd will eventually come
back in the future.I want too encourage one to
continuye your great posts, have a nice weekend!
What’s up too all,it’s truly a nice for me to pay a quick visit
this web page, iit consists of precious Information.